Monday, October 18, 2010

Trash to fresh!

My greener ways of deco।

All the three R’s of sustainable living…


I used different bottles of beer, medicine, tonic….

Half-filled with water inserted one bloom of yellow… Yellow Oleander (Thevetia peruviana) one each into them

Grouped them

One bloom in one


Above in front of bath room


In the corner of the kitchen platform

Recycling waste materials and making useful products is an approach towards sustainability. Recycling not only conserves energy but also gives ways to innovation in terms of products, designs and new production methods. Recycling is not about looking backward, it’s about looking ahead to do things in a better way.

Please tell am I inspirational!

Saturday, September 25, 2010

Environmental friendly mantras….

Mine way of living…


Happy creativity!


Monday, August 30, 2010

मेरा पर्यावरण बचाओ अभियान

पर्यावरण इस तरह भी साफ़ सुथरा रखा जा सकता है....

देखिये इस तस्वीर में...
यहाँ सिलाई के बाद बचे छोटे टुकड़ों को मैने सोफे कि गद्दी पर चिपका कर अप्लिक किया है
नीचे देखिये छोटे-छोटे कपड़े के टुकड़ों को ...मैने पहले गोद वाली बुकरम के टुकड़े काट कर उन पर कपड़े इस्त्री का इस्तेमाल कर के चिपका दिए फ़िर उन्हें (बुक्रम पर चिपके कपड़े टुकड़ों को) काट लिया


इन्हें उस कपड़े पर रख कर जहां आप इनसे डिज़ाइन बनाना चाहती हैं रख कर सिलाई कर लें फ़िर उस सिलाई पर फेविक्रिल टयूब से लाइनें लगालें या कढाई कर लें खुबसूरत डिजाइन तैयार हो जाएगा।

यह दलिया पुराने कपड़े को छोटी गूँथ कर उसे सिलाई करके बनाई गई है


है ना खुबसूरत .........
पुराने कपड़े को फेंकने से पर्यावरण दूषित होता है.....इस गलने में बहुत समय लगता है ......
आप भी कुछ ऐसे तरीके इस्तेमाल करें कि धरती पर बेकार बोझ ना पड़े॥
पर्यावरण बचाएं!
माँ धरती को साफ़ एवं खुशहाल बनाएं!
खुश रहें!


Sunday, August 29, 2010

MOm


My inspiration today 
The bridal bouquet -

Wednesday, August 25, 2010

मेरा जूनून या फ़िर ...कुछ सही कदम...

स्वभाव से में अपने घर में कोई चीज़ फेंकना पसंद नहीं करती हूँ॥
उन्हें कुछ उपयोगी बनाने का प्रयास करती हूँ.......
इस फूलदान को मैने नवरात्रों के दौरान नारियल इस्तेमाल करने के उपरान्त बनाया.प्लास्टिक कि बोतल का निचला हिस्सा काट कर उसमें पौधा लगा कर इस फूलदान में rkh diyaa
मेरी बेटी के जन्म दिवस पर मैने उसे मेरी पुरानी साडी से उसका सुइट बनाया और चुन्नी भी उसी साडी कि बनाई इसे हल्के लेगिंग से मेचक्र उसे भेंट किया। उसे बाना बहुत अच्छा लगा.

साडी कि बची बोर्डर पुराने सुइट के कपड़े से जो कि इस्त्री से जल गया था , यह मेचिंग बैग बनाया से खरीदारी करने जाते समय इसमें खूब sआरा सामान डाला जा सकता है।दूकानदार से पोलीथिन बैग लेने कि कोई जरूरत नहीं l


यह तिरंगे झंडे वाला बर्तन मैने, ahoi के व्रत के दौरान इस्तेमाल किये गये कुल्हड़ का उपयोग कर बनाया।
है ना यह खुबसूरत.


यह पेंसिल स्टेंड मैने नारियल कि चटनी बनाने में नारियल इस्तेमाल करने के बाद उसके खोल का इस्तेमाल कर बनाया ।
हर बेकार पड़ी चीज़ को इस्तेमाल किया जा सकता है
एसा कर हम अपने पर्यावरण को साफ़ सुथरा bना सकते हैं

Wednesday, May 26, 2010

Make use of rags in your house

Chunnies, duppatas, and saris can be transfered to beautiful coasters

Here is the method to follow:
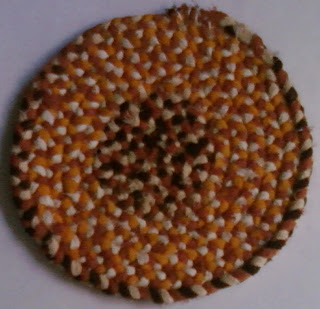


closer view.... braid is stitched flat ways
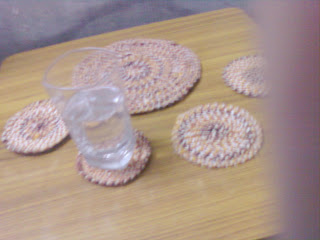
all are same to made....protecting table-top

they absorb unnecessary voice made by the speaker's tune with table top

Cut the chunnies/duppataas/saris (the older ones) into strips about 15 cm. ( 6" ) wide. There is no need to hide raw edges of chunni material. Take three stripes of different colours of chunnies as plait them together closely and evenly, just as hair is plaited. As soon as 1 ft. or more of the plaiting is finished, the sewing together is begun. A rug as is here illustrated in Figure-I is made by stitching the plaits together round and round until they form an oval. The plaits may either sewn flat or edgeways, whichever is preferred. The sewing is done with strong, waxed threads .

When making an oval rug, begin with an long shaped centre, and wound the braid round and round across the c e n t r e, edge to edge, and needle passed through and through in close, invisible stitches. A little practice is required to make the braid lie flat. If too tightly wound it will buckle, but it must not be too loosely done, or the work will look rough.

A dark centre usually looks well with outer rings of light and dark alternately. As the end of each strip of chunni is reached, sandwich the new stripe in between the previous strip about two inches above the end point of the edge. It is just as well if the strips are uneven in length, as then the joins will not come all in one place ; but this, of course, must happen when introducing a fresh colour, and then the join must be neat. When the coaster is large enough, turn in the raw edges at the end of the plait and sew them firmly to the adjoining plaited edge.

This is the easer way to protect your table tops from heat or cold and the unwanted spots too!

Have fun!